HOT SHOT 9-PRACTICE SKETCHING THE OUTLINES WITH ANGLES
Now! I am ready to go with HOT SHOT Number 9! I hope you’ve been putting the blind contour into practice? Just keep it going and flowing. Use up loads of sheets. Remember it’s the mileage covered in your sketch journey that matters. You really want to just keep it going, if you stop, just forgive yourself and start again!
There’s no better way to get better at anything than to just DO IT! Doing it correctly is what this blog is about, so be ready to give everything you pick up a go! Don’t seek for immediate results, just keep it going, nothing worthwhile ever came overnight!
If you missed HOT SHOT 7 & 8 just click HERE to see what the Blind contour was all about and keep it going. In this HOT SHOT we are going to be looking at practicing sketching of the outline with angles. When I say angles I mean the change in direction of the outline in terms of tilts and angles.
HOT SHOT 9
While sketching you could also start by considering the object in terms of angles. This is one method I use most when sketching the human face. I ways break the face down into simple angles and that helps me with the features too.
I am so grateful to God for helping me to get admission to Yaba College of Technology, where I had my first solid lessons in Art! It was while I was in my second year, while doing my National Diploma in General Art, that I was blessed with a wonderful Life Drawing Tutor, called Gbenga Orimoloye. While in the Life class with the model before us. He would come over the top of my drawing with a soft pencil and say, “JUST PULL THAT LINE, IF IT TILTS, PULL IT AGAIN, IF YOU SEE A CHANGE IN DIRECTION, PULL IT AGAIN!”
He really did everything possible to breakdown the figure in simple linear angles! After hearing him repeat this time and time again, I got hooked and almost became mad at it. I got a sketchbook and just kept on doing it to everything I saw!
Angles, angles, angles!!!
I tried my best to interpret the right tilt I saw in my sketches! This was a real eye opener for me! With time, after years of adopting this, though I am still learning, I have really enjoyed this technique and because of my love for geometry, it even became more relevant to my sketches.
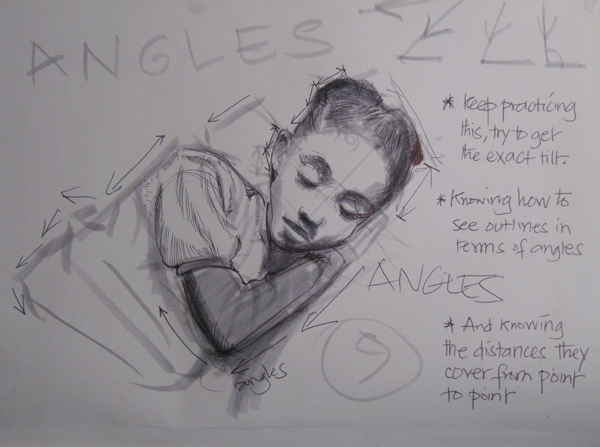
Adebanji Alade's demo for HOT SHOT 9- this is the sketch I worked on the video, I have just worked on it a little bit more and put some other important notes on it.
So this is all about seeing things and breaking them down into different angles. Try your best to do this! Don’t worry about proportions. With practice, the proportions will take care of themselves.
Everyone has the innate ability to master proportions and get them. I mention proportions because, it’s not just about pulling those lines to the right angle, but also knowing the RIGHT DISTANCE of the line from one point to another.
And because I am not dealing with drawing here but mainly sketching, you haven’t got the time to start measuring while sketching, it defeats the whole purpose of the spirit of sketching. What you must master is the ability to rationalize or judge a line or the distance of something in relation to another.
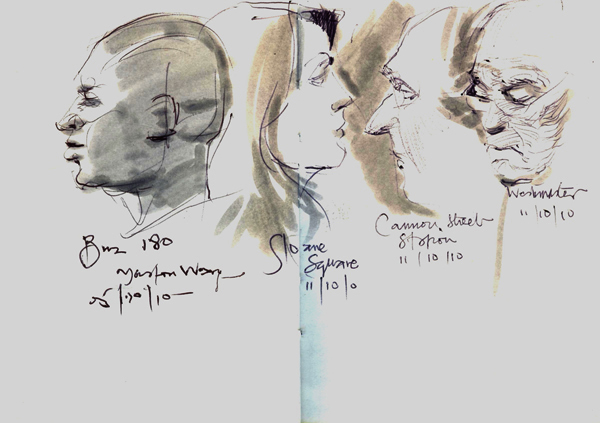
Adebanji's sketches showing angles 1- Looking carefully at these sketches, everything I have done here has been done with angles.
Never underestimate the power of your eyes! If you think this is impossible, then how come you are able to spot a faulty proportion in your sketch or that of another artist?
One of the great draughtsmen of this era, Anthony Ryder, has this to say about proportion, “Students tend to feel a lot of anxiety around the idea of proportion, perhaps because they believe that only a select few possess the special ability to judge proportion correctly. Having postulated the existence of this mysterious power, they come to the depressing conclusion that they don’t have it. Otherwise their drawings would have the seemingly miraculous perfection of the work of the masters. Not. I think that we are all born with an innate, undeveloped sense of proportion. As we grow up, we develop this sense in accordance to the demands of our daily life. thus we learn, from a very young age, how much hot water to put in the bath to make it the right temperature, how much milk to pour into the bowl with our cereal, how loudly we need to yell to get ourselves heard. We get feedback from our family, neighbours, teachers, and our own senses. We gradually as if by natural law, conform ourselves to the age-old dictum: moderation in all things. Since it takes time and a great deal of experience to acquire a sense of proportion in the rest of our lives, it shouldn’t be a surprise that it takes a while to do the same in drawing.”
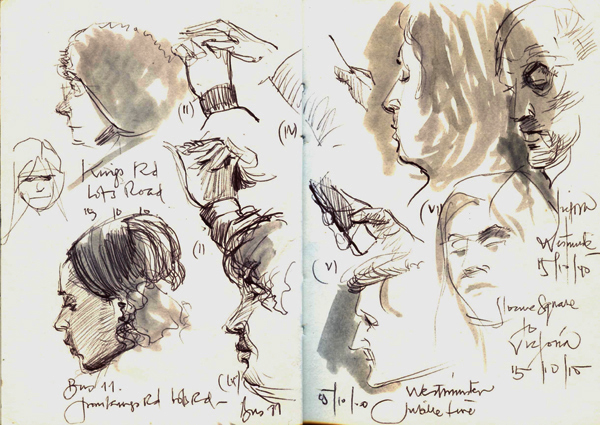
Adebanji's sketches showing angles 2-again here, especially in those hands and the profiles, angles have been utilized.
I hope this helps and really gets you flowing into just pulling those strokes with your pen or pencil in the right direction and making loads of sketches that reveal this great exercise!
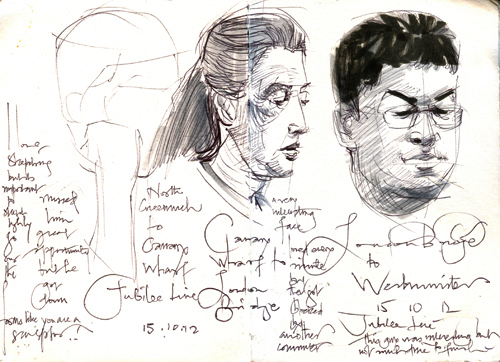
Adebanji's sketches showing angles 3- Look at the framework for the uncompleted sketch of the man with his hand against his face. That's all broken down into angles. The other two sketches were started off the same way.
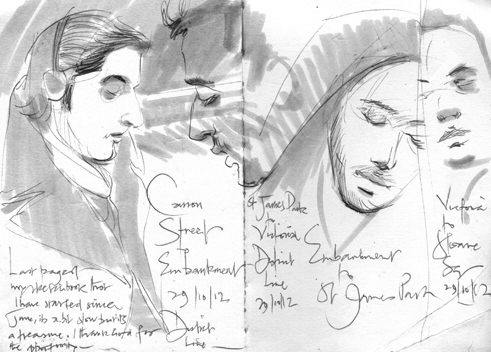
Adebanji's sketches showing angles 4-Every broad shape, especially the one of the man with the hood, were all done with angles. Watch out for the sudden changes in the angles in the man's face in the middle of the page.
If you have gained something or enjoyed this post, please comment, share or like with social media buttons below. KEEP SKETCHING!!!!
Tagged with: Adebanji Alade • angles • ball point pen • Daler Rowney A3 Sketchbook • Figure dra\wing • Gbenga Orimoloye • Kezia • Life Drawing • outlines • people • Sketches • sketching tips • tombow dual brush pens • urban sketching • Yaba College of Technology
Filed under: Inspiration to sketch • Sketchbook • Sketching Tips
Like this post? Subscribe to my RSS feed and get loads more!

Great stuff! Thanks for sharing your sketching tips. They’re always so helpful.
Hwee. I am glad you are enjoying it and finding it helpful!
Adebanji,
Thank you from the bottom of my heart for providing this! It is just tremendous to have a personalized sketching lesson from you! The videos are so well done and insightful. The additional text and explanation is also great. And made all the more personal by using your children as models in your sketches. All of the hot shots are just wonderful and so helpful. Thank you for the time and effort you are obviously putting into your inspiration sketch blog. I’m sure that everyone seeing your hot shots and blog are benefiting from the tips and lessons. I know I am. Thank you, Thank you, Thank you!!
Nice one Joel! It’s cool you noticed the personalised side to it. My family are most loyal models and they are FREE! Yes, it does take a lot of time but I think it’s always worth sharing knowledge!
Great stuff again … I am finding this really useful… keep up the good work!
Thanks Bill, I’m glad you are enjoying it and finding it helpful too!
Thank you do much for sharing this kn
You are welcome Patrick!
goods ideas for sketches
Thanks Fernando!
Hey Adebanji, this is really a great and in depth post, thanks so much for the time and effort you put in to making it. The last bit about proportions is a good reminder that it just takes thousands of hours of practice.
In these sketches are you shading with a brush pen? I love the simple washes, could you tell me what you were using here?
Thanks again and keep the fab videos coming!
Thanks Kelly, I am using a TOMBOW dual wash pen(N75) I think the N stands for neutral as it is a cool grey. I love it and I’ve used tons of them for my sketches.
I had much fun with outlines, and this post is absolutely fascinating! During the last weeks I tried to sketch my dad a several times and finally I used geometrical shapes and measuring. That was the first sketch looking like my dad and I am quite happy with that one. But now I will have another go with angles!
Thank you so much for your posts. They are brilliant and I am always looking forward to the next one!
Brilliant Anne! That’s the spirit because putting it into practice is very important. Sometimes the results won’t be immediate but keep it going, this is a journey of a life time and you just want to keep going one step at a time!
Thanks so much for yet another fantastic and very helpful lesson, Adebanji! I can’t wait to try it out. 🙂
Serena, I am glad you’ve got the hang of it! Keep it going and just make sure you try themout! Nothing beats the regular practice!
Hi Adebanji,
Thank you very much for you tips. They are really usefull and very well explained.
What kind of pen is that one that you use first? Lines looks really nice.
Waiting for new hot shots 🙂
Regards,
Pedro Alfarroba
Thanks Pedro, I am using a TOMBOW dual wash pen. It has a brush like tip on one end and a smaller felt tip on the other end. I use the brush like end most. And the type I use is a cool grey called N75. I think the N stands for neutral.
Hi Adebanji,
Thanks for the precious tip. I will try to find here in my city.
Regards,
Pedro Alfarroba
Cool, I hope you can find it or something similar.
Hi Adebanji,
The time till the new post, I will use to practice seeing and putting down angles. I feel blessed, to have such a wonderful sketching teacher! Thank you so much for sharing!
Have a nice week
Micki
Wow! I am happy to be your sketching teacher too, Micki! Practice, practice, practice- this is what makes the difference! Just keep it going and the results will come with time!
Hello Again,
Thanks for another brilliant demonstration – these are so enjoyable and helpful. I have sketched some roses using angles and really enjoyed the process. I also aprecciated your comments regarding symmetry and geometry – I really love drawing buildings and Architecture and I find your attention to detail so refreshing and inspiring…thanks again.
That’s great Sarah, it’s good you’re using this technique for roses. They can be applied to anything and these are the tools I use to sketch all the time. They are applicable to buildings too! Glad you are enjoying this!
Hi Adebanji, great videos! congratulations. I’m training the angles and the blind method, because I usually sketch in the tube here in Madrid.
I recomend your blog in the flikr page of urban sketchers spain because I think it may be very interesting for other sketchers.
Sorry for my bad english.
Thanks Jose, I am happy you are practicing the angles and blind contour- And thanks a million for sharing on the Flickr Urban sketchers Spain group- that is well appreciated! Lastly, I think your English is OK!
Thank you again for sharing your generous advice and showing your lovely sketches.
I feel I learn something from you each time.
Many thanks
Joy
Thanks Joy, I am happy you are learning something new!
Adebanji, first of all; your daughter is adorable. Just watching her made me want to take a nap too.
Secondly, this is my favorite Hot Shot so far: I can’t wait to get out and work on building a sketching starting from straight lines and angles. You’re teaching me a lot; keep up the good work (please!).
Thanks Jeff, I am happy you enjoyed this one! I guess it might be because, this is the one I use the most, so it easier to explain.
Wow, I just tried this and it is AMAZING!!! Thank you so much. I cannot believe the difference in how my sketches look after just quickly playing around with this and experimenting. I can’t wait to practice this some more! Your demos are really really good, and I so appreciate the time you have taken to share them with all of us. :0)
PS Many thanks to your wonderful life drawing tutor as well!
Hey I have only been following today but I feel as if you are my next teacher in terms of art. I really appreciate you knowledge of art and also you willingness to share with younger artist. I am thankful for your fruitfulness
Youve inspired me to keep trying,ive lost my original spark in art, once and a while i feel like i have it but i loose my grip. I struggle with inspiration and artists block. Im taking your advice on sketching people . I feel like theres still hope and that i can fall back in love with art. Thank you.
I was also wondering what dimensions your sketchbook is,even though it is small you seem to capture alot.
That’s great to hear! I mainly use a 4″ x 6″. then I moved to an 8″ x 8″ recently. But currently I’m using a 5.5″ x 8.5″
It’s never too late, just keep it going and enjoy the journey!